Showing posts with label handmade. Show all posts

26 Mar 2016

Mini fruits tart completed and unwrapping cat amigurumi crochet daiso kit

I was reluctant to do the felt mini fruits tart because wanted to do something else and left it for couple of days as I was busy organizing and decluttering my room. Still not finished as need shelves to display my handmade objects well the mini fruits tart is completed.
Each daiso kit does have instructions in both English and Japanese I fell geared towards the American market. Extra equipments are embroidery need I used size 10 and has wide eye, recommend using pva tacky glue as hold fast and does stick properly, dress making scissors plus little small kind used for cutting and fabric markers. The instructions says to make photocopies of pieces I suggest you make 2.
It doesn't look like on cover as I wasn't happy with the pastry base and was messy gluing the pieces together. I have been feeling tired for numbers of days this didn't help.
I can make this again as there some leftovers but the felt available tends to be a lot thicker.
Mean while I started opening this amigurumi cat charm kit. Amigurumi means knitted doll even though it is crochet as knitting involves 2 needles didn't technique all together. I prefer crochet so much easier but won't give up on the knitting.
Comes with wadding which is polyester not cotton as I thought, yarn, thread, eyes without the washer and ball chain. It says will take 6 hours and you need crochet hook-2.30 to 3, I used 2.50, yarn needle, marking pins, scissors, 2 pliers, glue, ruler and tweezers(if you have them).
Started this kit straight away unusual for me to buy amigurumi kit as I get my project recipes from the internet and print them out plus I have Japanese book on making similar mascot charms.

There is daiso needle felting kit on order and waiting for it arrive hopefully this cat with very short tail will be completed if not I'll add to stuff to do pile. Image editing program keeps dying on me so may have to get photoshop elements I use program for other things besides editing photos.

1 Aug 2013

Catching the last train to Craftstamper's Take it, Make it challenge

I think I just made it as the deadline is tomorrow besides I'll be off hunting painted dog sculptures.
Craftstamper's challenge was to create something using layer embossing as shown in July's edition.
Problem was I thought it was plain heat set embossing but reading the entry again and looking at the entry confirmed my suspicions. The card below was created last night using free clear stamp which came with June's issue, Wings is from Rockstar set Inkadinkadoo and some freebies from card making in simple steps.
I actually went out and brought some a set of coloured embossing powder they were cheap and discounted further. A craft store is relocating so everything is 50% off such a shame as I love the store's own brand glue as it doesn't warp the card or paper that much.
There's some elements I'm not happy with in fact I wasn't satisfied with other card my made it's just my inner critic and needs to get things spot on. Well there's so much I can do as all the monthly challenge have closed.
For Craftstamper's Take it, Make it Challenge 3: Layered Embossing.

I have been trying to find some time to do some more Smash book journals. I do have Red Folio by K and Company plus a few smash items. I'm trying to keep all my scraps and mementoes in one place but ends up as large heavy bag not that much portable than the bag I carry with me.
Still can't craft in the daytime and my chance will run out next week as I'll be on work placement. I hate working late at night because of lack of time maybe I feel so stressed out plus my day is not complete without spending some playtime with my hamster.
I'll see how it goes

20 Jun 2013

Visible Image June challenge

Ever heard of Visible Image I haven't until I discover them in July 2013 issue of Craftstamper magazine. Not only was free 'clear' stamp designed by Visible Image but in their advertised it showed some of range of stamps produced by the company and they are great too. What caught my eye was anime/manga inspired character stamps, I normally stay away from cartoon stamps because to be honest they are rubbish and stamps cost money so I only buy high quality impression.
I had bad experience with 'clear' stamps especially Stampendous as they tend to squishy and yellow but with Visible Image I gave an exception they use high quality photopolymer, their stamps are firm and give a good impression. Pop along to their website and gave the stamps a try.
Also they have monthly challenge going on their blog, For 'Visible Image has character' I will enter 2 cards, first one:
Edgar and his pet raven. I chose Steampunk style because character really suited to this theme. I did some research to get idea of what Steampunk the best way to do is look at fashion for colour scheme and definition. Majority of art involves clocks and gears but it's much more about this. Think of Doctor Who, HG Wells it's a good idea to watch some films/animation such as Steampunk.
Distress stains work well if layered or mixed with other colours here I used Seedless Perserve and Brushed Pewter for background. Edgar I coloured him using mixture of Distress Stains and Markers plus Ink palette as help to separate the different colours which are Pine Needles, Black Soot, Chipped Sapphire, Brushed Corduroy, Scatter Straw and Aged Mahogany. Highlights I used Inkessential white gel pen. I'm still practising with watercolour techniques using the Stains made it easier, the Markers were harder to manipulate the colour.
There's so much metal components on this card it kept falling over as I trying to photograph. I was thinking of dials and gears which compliment they each because everything is on the card for a reason as to convey a story. Idea-ology Sprocket gears, locket keys, Time pieces, Game spinners and other miscellaneous antique brass embellishments.
The side panels is stamped in Stampers' Anonymous ledger and others with embossed in Stampendous Fran tage aged bronze.
This month has been hectic with all these monthly challenges I'll leave Craftstamper for next one because need a rest. These challenges are good thing as keep the resistance and block way.

18 Jun 2013

Another set of cards for Stamping Sensation's June Challenge

I intended to make another card for Stamping sensations and ended up with 2. They have both the similar layout and bird themed stamps only difference is the colour.
This one is darker and still worked on card layout sketch, majority of materials came from Issue 62 of Papercrafter magazine. Infact there are several card and papercrafting packs of goodies but all cost £7.99. This stash has the summer palette of pinks, blues and greens. In Crafterstamper they showed how to make your own paper tapes using double sided sticky tape. I sort of panic because there was a colour clash or LED light was playing tricks on me. I just blasted the background in terracotta Colorwash spray and added lighter colours in the foreground.
Main stamp image is from Paperartsy Hot picks range and others are Crafty Individuals. I've found some wonderful Asian foam stickers from a crafty store. Normally I buy Sanrio, San x and other Japanese stickers in Hong Kong just to show there are good thing if you look in your local craft shop not Hobbycraft.
I decided to enter this one for Stamping Sensations: Summer Blooms. I'm still making paper flowers by hands but more sculptural using glossy accent to glue them on and gem in place of a brad.
Paper is from still from Papercrafter magazine collection.
Rubber stamps are: Stampers' Anonymous-Tim Holtz, Crafty Individuals and Cox and Cox- birds and nest stamp collection. It does still has more over collaged style but I'm working on the minimalism.
There one more set to complete before I rest for a bit and craft again.  
This is what Oscar made he altered a loo roll and is in process of altering a cloth.

22 May 2013

My entry for the another monthly challenge: How does your garden grow?

This card I decided to enter for May's Country View Craft's challenges because completed and submitted a tag for Tim Holtz's May tag of 2013. I still have my version of February to make give the fact I was forced to endure excessive noise and almost no sleep it has been a struggle. Why and also if I don't craft like every day I get very restlessness and irritable. My household is not the ideal place for crafting it was always my attentions when there's a sunny day with not so much wind to work outside. I rather listen to the songs of nature than the harsh tunes of music player. It's not music it's noise pollution.
Been a while since I made a card the last one was on Mother's day. The challenge for May is entitled "How does your Garden grow"
I have lots sheet of pre-distressed papers in various colours some using Distress Ink, Stains or a mixture of both. The floral stamps set I wanted it's by Paper Artsy, their Hot Picks range HP1004EZ I wanted this for a long time as it contains patterned flower.
I stamped flowers, petals on various paper scraps. The main stem is in Memories: Art Print Brown it didn't show up as much when the moths were added (Stazon- Jet Black). I outline the stem using fineliner. Further moths were stamped using Archival Ink on modeling film, the same kind used in April tag of 2013. A voice in my head kept saying emboss the edges of the petals so I did using Stampedeous Frantage Aged Gold embossing powder and it worked well.
More Distress ink was added onto the backing sheet to tone down the colours Faded Jeans, Walnut Stain and Moss Green. I ran a paper distressing tool on the edges before sticking the background to the add. Used idea-ology custom fastener to fix the flowers together before finally gluing the leaves and stapling the moths using tiny attacher. I added some words from Chitchat stickers the edges were coloured with Walnut Stain. There is an trend of adding large flowers on to card, seen as Create and Craft. This proof you don't need a CD-ROMs, craft sheets or even die cutting maching to make a card. All you ready need is your head but I do recommend buying Compendium of Curiosities vol 1 and 2 as they have tonnes of wonderful idea or go on youtube and watch his videos.
The next step for me is submit something to Craftstamper, I did send some ATCs but sadly they were never published. We'll see. Loads of people of submit of work so you have to create something exceptional to get noticed. I hope one day my work will get this attention. Why can't it be now?
It's the taking part which matters it's just I always improving my skills and there's other techniques I haven't discovered or tried out. 

19 May 2013

My take on Tim Holtz configuration boxes

It started with matchboxes shrines and then I thought I could combine several to make shadow boxes with different compartments. I was influence by Tim Holtz idea-ology configuration boxes but these are so hard to get and on most sites only book cover type is available. There's one place I can still try Sir Stampalot I used to buy wood mounted rubber stamps and Magenta pewter stickers.

Configuration boxes are also expensive it would be cheaper to make my own after all I've done a lot of paper crafting in the past (assembling papermodels). I started with 9 matchbox layout and changed so that I could smaller shapes and these can be rearranged. Each box is made out of Paper stacks- Lost and Found with left over sheet from K and Company. It helps to check the stuff in clearance shelves for more bargain goodness. I realised I could of drew the layout in PaintShopPro or DTP along with the individual boxes and print directly on the paper. The good think about idea-ology paper stash is the other side is plain.
I certainly I won't buy the crap from Create and Craft they are so bland and also p and p builds up with each item added to basket. The presenters act like complete noobs, well any way shadow boxes are like 3D scrapbook or collage- assemblage and great way of displaying mementos.
The trouble is I have to deal with no only tiredness, but excessive noise and idiots who won't watch in tv in silence and have volume turned on full blast. Looks like I going have to invest in noise cancelling headphone at least I won't have to hear the spite comments and devil worshipping crap.
I feel a day is wasted if I don't make something.

13 Apr 2013

Free time after 2 weeks of studying

Whenever I update my blog I first have to update my flickr photostream as well after filling in the descriptions its exhausting. I was off for 2 weeks on study learning about customer service and First Aid and had little time to do my posting which is steadily building up. In the free time I did have I managed to make some atcs and few of these.
My tags were chosen at all not be let down I started again and focused to making tags for January. My first tag ends up being too dark even though there's nothing wrong with it. Focusing what the month meant new year, winter and fresh start. Checking back on Tim's previous monthly tag I noticed he used Distress stains Picket Fence along side another colour and gave me an idea.
I used broken china as the additional colour and darken with Distress ink- faded jeans and added some peeled paint. After tinting up the wings I added some stickles it's best to squeeze a blob on craft mat or catalogue in my case and using a your finger to rub some glue on then dry using the heat it tool. If you are careful the inkjet printed image won't smudge as much. Collected some scraps and add them on numbers stamp from fairytale frenzy work great when stamped in forest moss and little outline for extra touch. Most of time I'm staring at the tag what to add because less is more. Chitchat stickers are useful to create your own pearls of wisdom but hard to choose from all those text. As there is no word for 'new' then I thought of what it represents. New day is like blank page in journal ready to filled and life can be one big journey or adventure for the soul. I've finally acquired some crinkle ribbon to finish off the tag, these work best if the ribbon is scrunched and up after colouring and dried under the heat it tool. All done I hope only use one tag for April when rest of materials arrives so expensive buying all of stuff for monthly tag in future I'll use what I have already only buy if necessary. Here is are ones created so far.
Altered this a while ago it's a holder for moo cards and was rather plain I had no idea how to decorate it so as when I brought hot fix tool I used sample gems and stuck them on felt and added charms and clasp. Now attached to my bag.
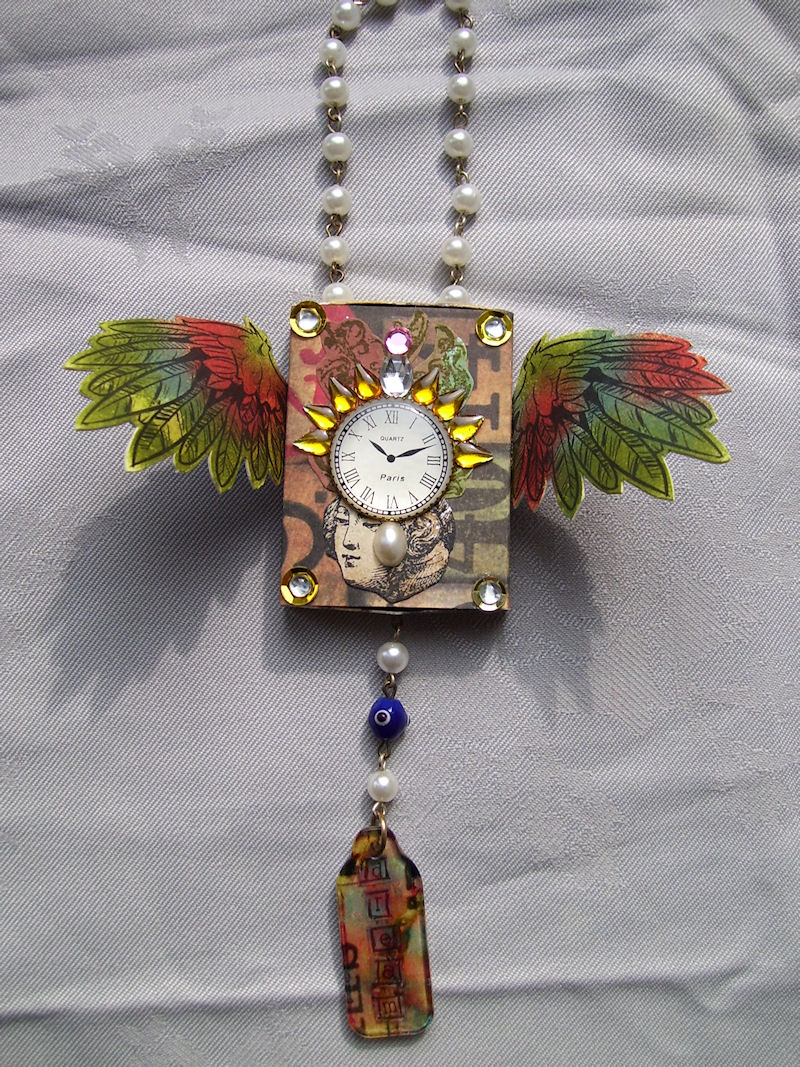
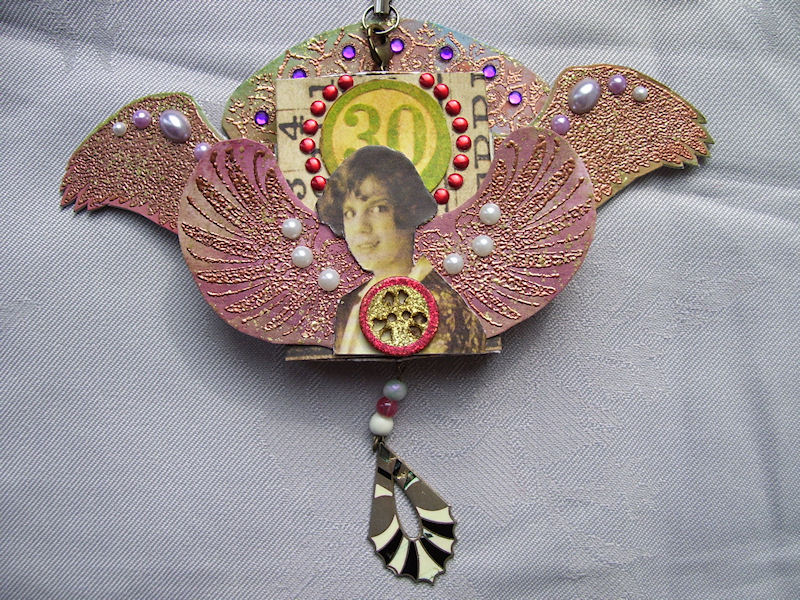
I've been looking at matchbox shrines for while when I was still studying on the course, there's one discussed by Arttrader magazine and thought to give it a try. On one boring Sunday I was making 9 matchboxes unfortunately I was sick in the evening probably something I ate, a knock on head can cause it well I did bang my head and felt some pain.
This the inside view it's better if the elements were positioned so it resembles a scene. I have collected some much 'stuff' over the years and majority of don't fit. Oh well use a bigger matchbox next time.
I discovered when I was making the matchbox shrine it crosses over with my jewellery making skills. The whole process feels like assemblage not just a collaging a great way to use bit of scrap. I was over the top with the wings, majority of matchboxes I've seen uses butterfly wings why not bird or bat. If you have wings than fly.
I have a lot of clay elements which are too fragile to be used as jewellery, tags and shadow boxes might be useful. It takes 2 days to complete, 1 day for sanding and painting and another for layering of varnishing. I was partly influenced by the configurations these cost money but buy something you can make already it takes a little time.

19 Apr 2012

My return to Blogging

Has been ages since I last update this and my other blog, I decided to return to blogging since I don't getting bored of playing MMOs. Things hasn't been the same when Kitsu Saga was closed down and Jade Dynasty, my character has ascended but becoming boring now and also stupid prick keeps turning the router on whenever I'm online. The router is in another room and choose to work downstairs because this idiot. I wish for my own studio, a space for me and no one else. During my absence I have been busy crafting with numerous projects on the go and acquiring wonderful items.
The picture isn't great since I took this while the laundry was out. During my travels to St Nicholas's Market, I found a cabinet displaying all these wonderful netsuke, I've seen them on Bargain Hunt and other Antique programme. Ah, what to choose they are so lovely, cute rats, gracious dragons so I settled for this cobra. It's not rearing its fang but smiling. The block on the left I believe to be a metal stamp and could be used to stamp on clay, Fimo or other soft material. Sadly the place I brought the block from is now closed down, the shop was called Shared Earth and was only place which sold Divine Chocolate. Sad really all the wonderful shops I used to visit are now gone.
There was two holes on the netsuke, further research I discovered the netsuki are kimono attachments. Have a look at the link for more information. I brought another one from Strapya, this one is carved out of boxwood and of my animal sign. More photos to come.
Over the Christmas period I tried my hand at patchwork, took ages to bast all the fabric edges of the hexagons. The sewing took no time at all, this project is on hold as I was bored of removing all the stitches I'll return later on. Still trying to figure out what I'll use the patchwork fabric for but it's a great way to use up all those scraps.
I've found this plush kit in Hobbycraft. I think you can machine sew the individual parts together. I've made two of these plush mouse. Handmade objects have such charm and whimsical appeal.
There's more photos to show and many finished work to show. I'll update my flickr album as well because have paid for year's subscription.

21 Dec 2010

Tatting continues

Inspired by shuttles on google I decided to make some of my own using shrink plastic. I love this stuff it's magical, a thin sheet when heated becomes 7 times thicker. There's lot of shrink plastic in my collection which are not used much. The clear shrink plastic feels like acetate, I was intented to use that for jewellery.
The handmade ones are about 5 cms and perfect for using smallest amount of cord as possible. Some shuttles are self closing which means the cord won't fall out when tatting but tends to run out quicker.
I still trying to complete the pointed star challenge using template by Teryl's hollins. First of all I tried to create each indivdual piece only to be confused and which part to join because when you are working the design is reversed. Started again do 1st run and then the 2nd switching shuttles to create a double crescent.  Almost completed and can do SCMR without referring to the instructions. By learning new techniques it will make tatting a motif easier. After a while it becomes repetitive after a while.

Completed 16/12/2010